Thursday, June 10, 2010
Use Multi-Byte Character Set
error C2664: 'InternetOpenW' : cannot convert parameter 1 from 'const char [10]' to 'LPCWSTR'
when I was trying to compile/build my source code including web.cpp and web.h. Later comparing my old setting with the new ones I realized that I solved it using the project properties.
Right Clik on Project name > Properties > Configuration Properties > Character Set should be chosen as "Use Multi-Byte Character Set"
Tuesday, June 8, 2010
How to Install OpenCV 2.1 on your Windows using Cmake GUI


- C:\Program Files\OpenCV\OpenCV210\3rdparty
- C:\Program Files\OpenCV\OpenCV210\apps
- C:\Program Files\OpenCV\OpenCV210\data
- C:\Program Files\OpenCV\OpenCV210\utils
- And also should include CmakeLists.txt, (C:\Program Files\OpenCV\OpenCV210\CmakeLists.txt)
Download “cmake-2.8.1-win32-x86.exe” and install Cmake GUI.
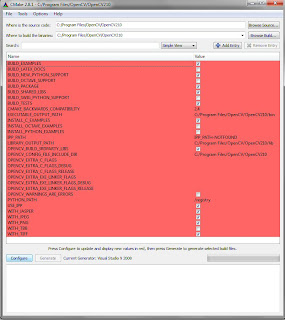
- Where is the source code? > C:\Program Files\OpenCV\OpenCV210\
- Where to build the binaries? > C:\Program Files\OpenCV\OpenCV210\
- Library files (C:\Program Files\OpenCV\OpenCV210\lib) and Binaries (C:\Program Files\OpenCV\OpenCV210\bin) are going to be put in corresponding folders.
- Click “Configure” for a second time and the red lines will turn white. Then click on “Generate”.
- “OpenCV.sln” will be put in C:\Program Files\OpenCV\OpenCV210\.
Monday, April 19, 2010
Install OpenCV 2.1 for Microsoft Visual Studio 2008
Install OpenCV:
- Download the OpenCV 2.1.0 Windows installer from SourceForge - "OpenCV-2.1.0-win32-vs2008.exe".
- Install it to a folder, say "C:\Program Files\OpenCV\OpenCV210\". This article will refer to this path as $openCVDir
- During installation check the option to add it to your Current User PATH
Configure Visual Studio:
- Open VC++ Directories configuration: Tools > Options > Projects and Solutions > VC++ Directories
- Choose "Show directories for: Include files" then Add "$openCVDir\include\opencv"
- Choose "Show directories for: Library files" then Add "$openCVDir\lib" (*.lib and *.dll files)
- Choose "Show directories for: Source files"
Add "$openCVDir\src\cv"
Add "$openCVDir\src\cvaux"
Add "$openCVDir\src\cxcore"
Add "$openCVDir\src\highgui"
Configure your Project:
After you've created a project you'll need to add the OpenCV dependencies.
Open Project Properties: Project > %projectName% Properties...
Open Linker Input properties: Configuration Properties > Linker > Input
Open the "..." window to edit "Additional Dependencies" and on each line put:
"cv210.lib"
"cxcore210.lib"
"highgui210.lib"
"ml210.lib"
"opencv_ffmpeg210.lib"
And any other lib file necessary for your project
Your project should now build. If you get any errors try restarting Visual Studio and then doing a clean Rebuild.
Friday, February 5, 2010
Bet and Win
Wednesday, February 3, 2010
Monday, January 11, 2010
Running OpenCV using Microsoft Visual Studio 2008


- Go to Tools => Options
- Then, Project and Solutions => VC++ Directories => Library files. Set the directories as shown in image
- Project and Solutions => VC++ Directories => Include files. Set the directories as shown in image.
- File => New => Project
- In Project Types, select Win32. In Templates, select Win32 Console Application. Give a name for your project right next to "Name:" and click "OK".
- Click "Next" in the next window
- In the "Application Type", select "Console Application". Select "Empty Project" in additional options. Then click "Finish".
- Right click on "Source Files", click Add => New Item.
- Under Categories click on "Code", then under templates click on "C++ File". Then give a name for your *.cpp file.
- From the top menu click on Project => Properties (Alt + F7).
- Go to Configuration Properties => Linker => Input and under additional dependencies add cv200.lib, highgui200.lib, cxcore200.lib, cv200d.lib, highgui200d.lib, cxcore200d.lib
- Compile (Ctrl + F7)
- Build (F7)
Question: I'm developing a C++ command-line application in Visual Studio and need to debug it with command-line arguments. At the moment I just run the generated .exe file with the arguments I need (like this program.exe -file.txt) , but this way I can't debug. Is there somewhere I can specify the arguments for debugging? Thanks a lot.
Answer: Yes, it's on the Debugging section of the properties page of the project. In VS 2008, right click the project, choose properties, go to the Debugging section -- there is a box for command line arguments.


